UberVolume
Jump to navigation
Jump to search
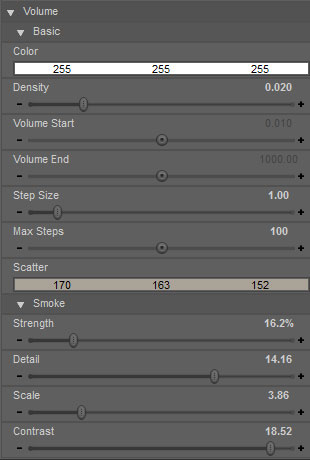
UberVolume is an interior volume shader (in prman speak) for DAZStudio that allows you to produce a variety of Smoke/Fog/Mist/Cloud affects.
User Guide
Setup
File:UberVolume uv step by step.jpg
UberVolume can be used in several different ways. In order to create a volumetric spotlight, follow these steps:
- Create a Spotlight (1)
- Double-click the 'Parent Cone to Light' or one of the others marked with 2 in the above image.
If you would like to apply one of the look presets, you can then:
- Select the SpotLight 1 Volume (3)
- Go to surfaces and select the SpotLight 1 Volume (4)
- Double-click on the !Uber Volume Dust, Cloud, etc to apply (6 in the image)
- Select whatever effect you want to produce, these can be edited in the surface for strength etc. See below.
Basic Controls
Bellow is a description of the various controls of UberVolume.
- Color
- The Color of the Volume
- Density
- The Density of the Volume; The higher the value the more difficult to see through the volume.
| Density 0.01 | Density 0.02 | Density 0.05 |
|---|---|---|
| File:UberVolume uv def.jpg | File:UberVolume uv density02.jpg | File:UberVolume uv density05.jpg |
- Volume Start/End
- Min/Max distance the light will penetrate the volume. Leaving these values small/large will ensure the entire volume is used.
- Step Size
- This is the main speed/quality control and represents how often the volume is sampled along the light ray. Small values will mean many samples and smooth transitions; Large values can lead to grainy images and fast renders.
| Step Size 1.0 | Step Size 8.0 |
|---|---|
| File:UberVolume uv def.jpg | File:UberVolume uv steps8.jpg |
- Scatter
- The Color that is scattered, tinting the background the complementary (opposite) color of the scatter color.
| Scatter Blue | Scatter Orange |
|---|---|
| File:UberVolume uv scatter001.jpg | File:UberVolume uv scatter150.jpg |
Smoke Controls
Adding smoke will add a 3D noise texture to the Volume.
- Strength
- This is a mix value between an even volume and the smoke pattern.
| Strength 0 | Strength 50 | Strength 100 |
|---|---|---|
| File:UberVolume uv density02.jpg | File:UberVolume uv smoke050.jpg | File:UberVolume uv smoke100.jpg |
- Detail
- The amount of detail in the smoke. Low detail can look puffy while high detail can look more wispy.
| Detail 1 | Detail 10 | Detail 20 |
|---|---|---|
| File:UberVolume uv smoke100.jpg | File:UberVolume uv smoke100 detail10.jpg | File:UberVolume uv smoke100 detail20.jpg |
- Scale
- The size of the noise pattern. Large scale can look more like clouds while scale values can produce a dusty look.
| Scale 1 | Scale 10 | Scale 20 |
|---|---|---|
| File:UberVolume uv smoke100 scale01.jpg | File:UberVolume uv smoke100.jpg | File:UberVolume uv smoke100 scale20.jpg |
- Contrast
- The Contrast between the smoke/empty areas. A high value produces hard transitions.
| Contrast 1 | Contrast 5 | Contrast 20 |
|---|---|---|
| File:UberVolume uv smoke100.jpg | File:UberVolume uv smoke100 contrast05.jpg | File:UberVolume uv smoke100 contrast20.jpg |
